How to Get Minecraft Skins (2022)
Our method and sources work on both Minecraft Java and Bedrock editions. You can use all the skins you find on any edition of the game with no issues. Moreover, we have divided the guide into separate sections for all the different platforms that you can play Minecraft on, including Windows PCs, Mac, Xbox and PS4/ PS5 consoles, and iPhone and Android phones. Use the table below to navigate to the step-by-step process for the platform of your choice.
Websites to Download Skins in Minecraft
Unless purchased from the official marketplace, Minecraft skins can be downloaded as PNG files for free from a variety of sources online. Then, you can manually upload the skins into your game to change the look of your blocky character. As for the sources, you can use one of the following websites to download skins:
SkindexTynkerNameMCGoogle Play StoreApple App StoreMinecraft Official Marketplace
Whether it’s a separate app or a free online website, make sure to avoid the many fake Minecraft apps while downloading skins. Also, if you wish to show off your creativity and stand out from the crowd, you can even make your own Minecraft skin to use in the game. Irrespective of how you obtain it, let’s go over how to get the Minecraft skin in your game.
How to Find and Download Minecraft Skins
There are several community-based websites where you can access hundreds of thousands of Minecraft skins for free. The website we will use to download skins in this tutorial is called Skindex, and it is one of the most popular options.
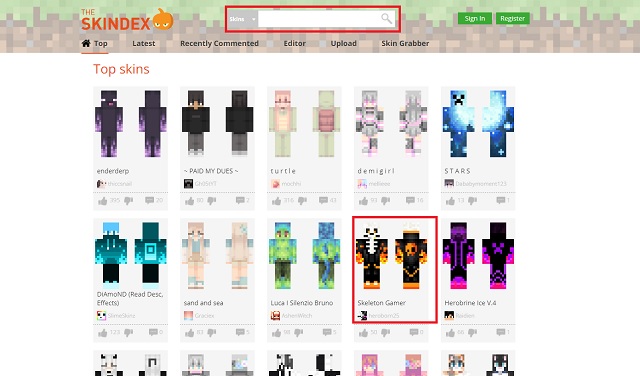
- First, go to the Skindex website and click on any of the skins you like. We will use the Skeleton Gamer skin to demonstrate the steps. You can use the search option at the top to look for a specific character or theme skin. Moreover, check out our lists of the coolest Minecraft skins and the best Minecraft girl skins via the provided links.
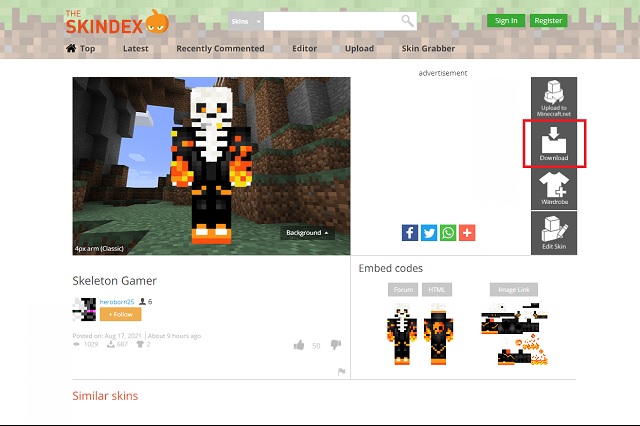
- Once you have selected a skin, you will be taken to a new page with multiple options to export the skin. Here, click on the “Download“button in the right menu next to the skin.
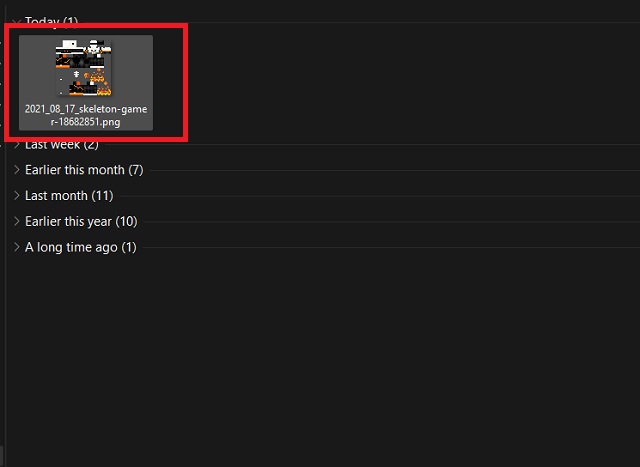
- Your desired skin will immediately be downloaded as a PNG file to your computer. You will find it in your Downloads folder, and it will be a low-quality PNG file.
Install Skins on Minecraft Java Edition (Linux, Windows, & macOS)
On the latest edition of Minecraft Java Edition, you can change the skin in two easy methods – using the game launcher and on the official website. So let’s take a look at how both of these methods work:
Change Skin in Minecraft Launcher
To get your new Minecraft skin installed in the Java edition, open the Minecraft launcher and follow these steps:
- In the launcher, make sure the Java edition is selected on the left menu. Then, click on the “Skins” tab on the top menu.
- Here, you can find all the skins you have used in your game. Click on the “New skin” option to get your Minecraft skin in the game.
- In the new section that opens up, click on the “browse” option and select the PNG file of your skin. Then you can name the skin under the “name” tab. As for the player model, selecting the “slim” option can get you slightly skinnier player arms. Finally, click on the “save” or “save & use” option to store and equip the skin.
Change Skin on Minecraft Website
As long as your device is connected to the internet, you can upload the skin on Minecraft’s official website to change your skin on the Java edition. Doing so immediately updates the skin on all devices you have Java edition installed on. Here’s how to do it.
- To get started, go to Minecraft’s official website and click on the “Log In” button on the top right corner.
- Then, on the next page, you will be asked to log into your Minecraft account. You can do so using your Mojang account or Microsoft account connected to your game.
- Then, on your Minecraft profile page, click on the “skin” tab on the left side.
- On the skin page, you first need to choose the model for your character. You can either select the classic model or the newer slim model. All skins yield similar results on both models.
- Then, scroll down and choose the “select a file” option to upload your skin. Now, you need to select the PNG file with your skin.
- Finally, the site will show you the newly uploaded skin file. Click on the “upload” button to finish the process. Doing so will automatically get the Minecraft skin in your game.
Install Skins in MCPE on Android, iPhone, and iPad
The official Minecraft mobile app gives you three ways to install new skins. You can either use a 3rd party skin app to install skins or the official marketplace if you don’t want to do it manually. As for the manual process, here’s how to do it.
- First, open your Minecraft app and tap on the “dressing room” option. It’s present in the bottom right corner.
- Then, in the Dressing Room, click on the third option on the left menu. It’s marked with a green hanger icon.
- Here, under the “owned” section, tap on the “Import” button.
- In the new subsection, tap on the “Choose new skin” button and select the PNG file for your skin.
- Once your skin is uploaded, click on the character switcher option to save it. It’s the first icon at the top on the left side menu.
Install Skins on Minecraft Bedrock (PC, PS4/ PS5, and Xbox)
Thanks to the synced environment, you can use the same method to get your Minecraft skin on all platforms of the Bedrock edition. It’s almost the same as the method on Minecraft Pocket Edition. You can even use the following method on the Minecraft 1.19 beta.
- First, open the game and click on the “dressing room” button in the bottom right corner of the homescreen.
- In the dressing room, click on the classic skins icon. It’s the green-colored hanger icon and the third one on the left side menu.
- In the next section, click on the “import” button under the “owned” skins section.
- Finally, click on the “choose a skin” button and select the PNG file of your skin.
- Then, to save the newly imported skin, click on the first icon on the left menu. It will take you back to the main dressing room while saving your new skin.
Now that you know how to get Minecraft skins in your game, here are answers to some of the common queries and errors you might face.
Q. How to sync Minecraft skins in Bedrock edition? Thanks to the connective world of Bedrock edition, you can sync your skin on all your devices. To do so, make sure to turn off the “only allow trusted skins” toggle under your profile settings. Or you can manually get your skins on each device using the above-mentioned methods. Q. Can I use transparent skins in Minecraft? Only the Minecraft Bedrock edition supports transparent skins. If you upload them on the Java edition, the transparent parts of the skin get replaced by black color.
Q. Do I need separate skin files for each Minecraft edition? The same Minecraft skin PNG file can be used on any edition (Java or Bedrock) and any version. Irrespective of the model, version, and platform, skins work the same way.
Q. Do Minecraft skins cost money? Unless you buy them from the official marketplace, all the Minecraft skins available online are free. Though, you can find some paid third-party skin apps on the Apple App Store and Google Play Store. But we don’t suggest using them or spending money on them.
Q. How do I change my Minecraft skin? After applying a skin, you can change it using the same method you used to apply it in-game. If you purchase a skin from the marketplace, it can also be applied and chosen from the dressing room.
Easily Get Minecraft Skins for Java and Bedrock
With that, you are now ready to download and use any Minecraft skin in the game. The installation process is easier than making a crafting table in Minecraft. But make sure to save your skin once it’s installed. Many beginners make the mistake of exiting the menu without saving the skin. Though, choosing the perfect Minecraft skin isn’t an easy task either. So, you can use our list of the best Minecraft skins to make a perfect pick for you. That being said, it’s time for you to install new Minecraft skins in-game. Do tell us about the skin you choose down in the comments section.


